在LNMP或Nginx上配置NameCheap免費SSL證書
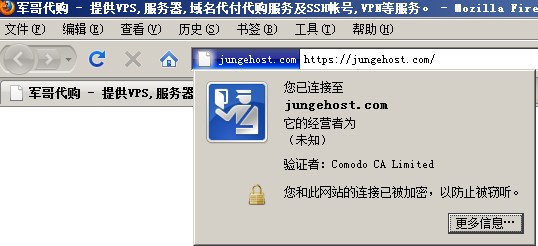
簡單來說HTTP協議傳輸是不安全的,可能會存在被劫持(如運營商或其他劫持者劫持來插入廣告),HTTPS是一直相對來說要安全一些的,使用SSL證書來加密傳輸數據。目前有很多SSL證書的獲取途徑,如namecheap購買域名贈送(Comodo PositiveSSL)、Let's Encrypt、其他免費SSL證書和自購等渠道。
SSL需要有一個獨立IP,也就是一個獨立IP只能對應一個SSL。SNI技術的出現,一個IP只能對應一個SSL的時代早就已經過去,目前除了XP及較老的安卓版本外都已經支持SNI,實現多域名虛擬主機的SSL/TLS認證。(什么是SSL?)
一、準備工作
1、需要Nignx已經編譯ssl 模塊(lnmp一鍵安裝包已經編譯安裝上),如果沒有需要重新編譯,方法可以參考Nginx無縫升級。
2、再NameCheap已注冊/轉移域名或購買主機產品,且購買是在購物車上添加了免費SSL(PositiveSSL)。如果有其他自購的證書步驟是基本差不多的。
二、使用OpenSSL生成證書 (注:一下藍色加粗字為執行時輸入的命令!)
1、生成RSA密鑰和CSR證書,下面以vpser.net域名為例:
vpser:~# cd /usr/local/nginx/conf/
vpser:/usr/local/nginx/conf# openssl req -new -sha256 -newkey rsa:2048 -nodes -keyout www.0794baidu.com.key -out www.0794baidu.com.csr
Generating RSA private key, 2048 bit long modulus
.....+++
.+++
e is 65537 (0x10001)
You are about to be asked to enter information that will be incorporated
into your certificate request.
What you are about to enter is what is called a Distinguished Name or a DN.
There are quite a few fields but you can leave some blank
For some fields there will be a default value,
If you enter '.', the field will be left blank.
-----
Country Name (2 letter code) [AU]:CN //輸入國家簡寫
State or Province Name (full name) [Some-State]:ShanDong //省市
Locality Name (eg, city) []:JiNan???????????????????????????? //城市
Organization Name (eg, company) [Internet Widgits Pty Ltd]:VPSer?? //組織名稱或公司名稱
Organizational Unit Name (eg, section) []:????????? //可以不用填
Common Name (eg, YOUR name) []:www.0794baidu.com? ? ?//輸入要配置ssl的域名,如www.0794baidu.com,注意vpser.net.com 和www.0794baidu.com 屬于不同的域名,目前一般寫帶www的,不www的會自動給加上。
Email Address []:admin@vpser.net ? ? ? ? ? ? ? ? ? ? //輸入郵箱
Please enter the following 'extra' attributes
to be sent with your certificate request
A challenge password []:???????? //可以不用填
An optional company name []:???????????? //可以不用填
按上面的注釋輸入相關信息后,會在目錄下面生成vpser.net.csr這個文件,執行cat www.0794baidu.com.csr
將下面以-----BEGIN CERTIFICATE REQUEST-----開頭到-----END CERTIFICATE REQUEST-----結尾的全部內容復制下來。我們需要使用這個www.0794baidu.com.csr文件里面的內容去NameCheap生成SSL證書。
li88-99:/usr/local/nginx/conf# cat www.0794baidu.com.csr
-----BEGIN CERTIFICATE REQUEST-----
MIIBzTCCATYCAQAwgYwxCzAJBgNVBAYTAkNOMREwDwYDVQQIEwhTaGFuRG9uZzEO
MAwGA1UEBxMFSmlOYW4xEjAQBeNVBAoTCUp1bkdlSG9zdDEOMAwGA1UECxMFanVu
Z2UxEjAQBgNVBAMTCVNoaUp1baBMaTEiMCAGCSqGSIbcDQEJARYTYWRtaW5AanVu
Z2Vob3N0LmNvbTCBnzANBgkqhkiG9w0BAQEFAAOBjQAwgYkCgYEA0R9hda1NJdoO
2tbvHevVY3fdpdn8ESpSewHC9yc9zVoc0tz9Ww5EfpDV9L222xv/Z8DlDf2pUfIG
X7F15qIQJZ/VCUDNxS5Y7bjNTzduMq8yQnqkB6h/dpnlFTJlDQrAl6vaoOhBcB5L
hMLAQBf1V8800MIn3nfxb9E6aoydSk8CAwEAAaAAMA0GCSqGSIb3DQEBBQUAA4GB
AJxQOaFHra/ILos8+HO8Wn/2bhfWAUR4ovyRGKMB/n0BQlHPfNhKbILRv9KI5EUL
dc6HCf3AALetjNiPHrfpJOCj4Ljqchu3WeodthuwRd9hzhZHCf43UiopofbfRzMp
lmAJFuUwN93IgFSrslCh66JaQceNa5x/TQIsmviuKZGC
-----END CERTIFICATE REQUEST-----
三、NameCheap生成數字證書
1、登錄NameCheap.com后,會在后臺首頁提示你有一個未激活的SSL認證產品,如下圖:

點擊上面的“SSL Certificates Page”鏈接。
2、激活SSL證書

點擊“Activate Now”即可激活SSL產品。
3、向CA(數字證書頒發機構)提交OpenSSL生成的證書。
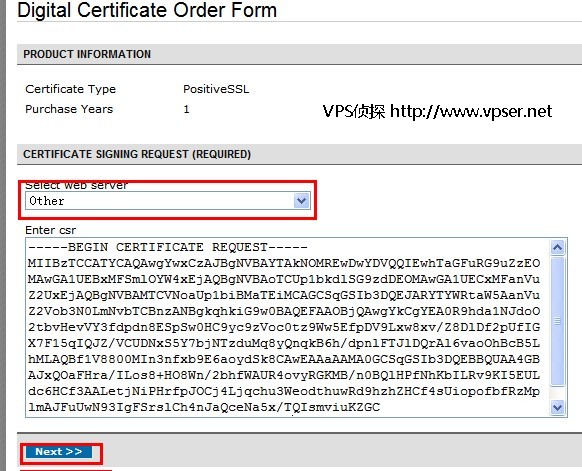
Web服務器軟件沒有Nginx,只有選擇other,下面的csr,填寫www.0794baidu.com.csr的內容,即前面要求復制下來的以-----BEGIN CERTIFICATE REQUEST-----開頭到-----END CERTIFICATE REQUEST-----結尾的內容,是全部包括----的開頭,且不要改動文件內容。
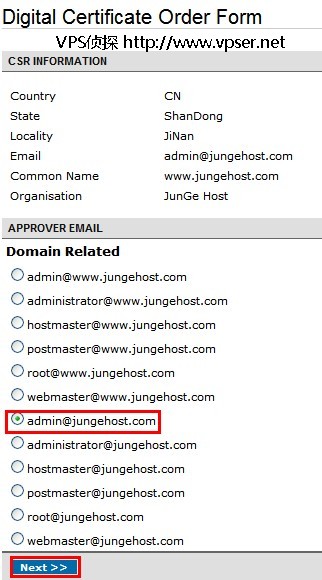
4、選擇域名管理員郵箱,郵箱必須是能夠接收到郵件。同時確認一下生成證書時填寫的信息是否正確。
5、提交訂單
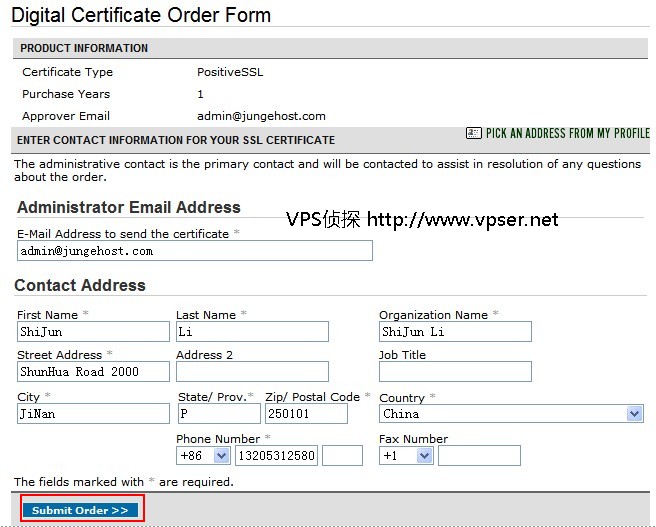
檢查一下上面的信息是否正確,然后點擊“Submit Order”。
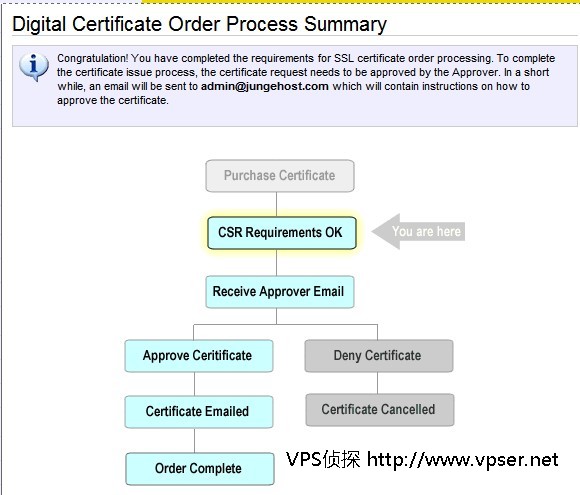
6、郵箱驗證
過幾分鐘或10幾分鐘郵箱里就會受到一封Comodo寄來的驗證郵件,如下圖:

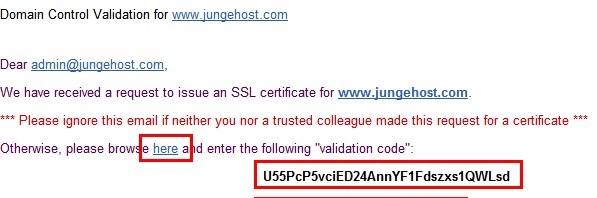
點開上面的鏈接,然后輸入上面的優惠碼。
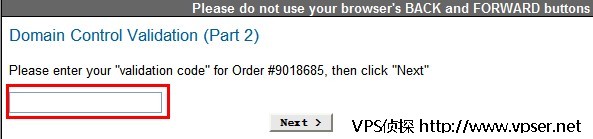
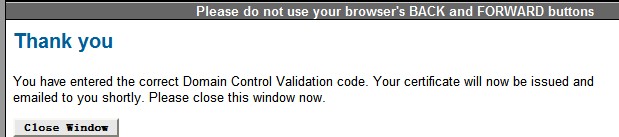
驗證完成!
7、驗證完成后幾分鐘就會受到Comodo寄來的數字證書。

四、Nginx虛擬主機設置SSL
1、下載郵件附件里的www_vpser_net.zip,上傳到/usr/local/nginx/conf 下面。
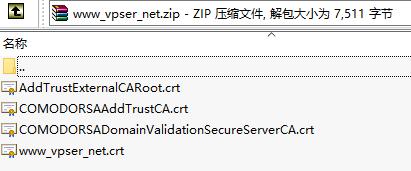
2017年2月update:壓縮包內文件有些變化,變化后只有兩個文件:www_vpser_net.crt和www_vpser_net.ca-bundle。
合并方法:cat www_vpser_net.crt www_vpser_net.ca-bundle > www.0794baidu.com.crt
因為這是COMODO的證書,還需要一些合并操作,方法如下:
cat www_vpser_net.crt COMODORSADomainValidationSecureServerCA.crt COMODORSAAddTrustCA.crt > www.0794baidu.com.crt
COMODO的證書不要將AddTrustExternalCARoot.crt合并到www.0794baidu.com.crt的證書里,要不然ssllabs測試時會提示:Chain issues - Contains anchor
2、Nginx虛擬主機添加SSL
具體完整配置文件如下:
server
{
listen 443 ssl; ? //如果需要spdy也可以加上,lnmp1.2及其后版本都默認支持spdy,lnmp1.3 nginx 1.9.5以上版本默認支持http2
server_name www.0794baidu.com vpser.net; ? ? //這里是你的域名
index index.html index.htm index.php default.html default.htm default.php;
root /home/wwwroot/www.0794baidu.com; ? ? ? ? ? ?//網站目錄
ssl_certificate /usr/local/nginx/conf/www.0794baidu.com.crt; ? ?//前面郵件收到zip文件合并操作后的文件
ssl_certificate_key /usr/local/nginx/conf/www.0794baidu.com.key; ? //前面生成的密鑰
ssl_ciphers "EECDH+CHACHA20:EECDH+CHACHA20-draft:EECDH+AES128:RSA+AES128:EECDH+AES256:RSA+AES256:EECDH+3DES:RSA+3DES:!MD5";
ssl_protocols TLSv1 TLSv1.1 TLSv1.2;
ssl_prefer_server_ciphers on;
ssl_session_cache shared:SSL:10m;
include wordpress.conf; ?//這個是偽靜態根據自己的需求改成其他或刪除
#error_page 404 /404.html;
location ~ [^/]\.php(/|$)
{
# comment try_files $uri =404; to enable pathinfo
try_files $uri =404;
fastcgi_pass unix:/tmp/php-cgi.sock;
fastcgi_index index.php;
include fastcgi.conf; ? ? //lnmp 1.0及之前版本替換為include fcgi.conf;
#include pathinfo.conf;
}
location ~ .*\.(gif|jpg|jpeg|png|bmp|swf)$
{
expires 30d;
}
location ~ .*\.(js|css)?$
{
expires 12h;
}
access_log off;
}
將以上內容按照自己的配置修改,LNMP一鍵安裝包用戶添加到/usr/local/nginx/conf/vhost/域名.conf 文件最后面,其他用戶按實際情況而定,一般加在nginx.conf 里任意一個server {}的后面即可。
然后執行/usr/local/nginx/sbin/nginx -t 檢查配置是否有錯誤,執行/usr/local/nginx/sbin/nginx -s reload 重新載入配置文件使其生效。
li88-99:/usr/local/nginx/conf# /usr/local/nginx/sbin/nginx -t
the configuration file /usr/local/nginx/conf/nginx.conf syntax is ok
configuration file /usr/local/nginx/conf/nginx.conf test is successful
li88-99:/usr/local/nginx/conf#/usr/local/nginx/sbin/nginx -s reload
另外如果有iptables之類的防火墻需要將443端口加入運行的規則里。
如果想讓http的訪問都調到https上,不再允許http訪問的話可以將原來80的虛擬主機配置替換為如下配置:
server?{
listen?80;
server_name?www.0794baidu.com;
return?301?http://www.0794baidu.com$request_uri;
}
五、測試
在Chrome、Firefox、IE7下面訪問 http://www.0794baidu.com 測試均沒有問題,歡迎各位測試反饋結果。如果是完整只https訪問的話一般還需要修改網站后臺的設置,一下模板上寫死的地址等。
PS:需要SSL且不想花費太多的話,可以選擇NameCheap注冊或轉入域名獲得免費SSL,VPS偵探也會在網站上不定期更新一些NameCheap的域名優惠碼。
>>轉載請注明出處:VPS偵探 本文鏈接地址:http://www.0794baidu.com/manage/namecheap-free-ssl-nginx.html








@Nedo, 301是有緩存的,清一下緩存就行了
軍哥你好
我在網站.conf里用你的80端口跳轉代碼,但第一次保存時沒有改網址,一訪問我的域名就重定向到vps偵探了,后來怎么改也不起作用。lnmp重啟過多次。
這是后來百度之后改過的
erver
{
listen 80;
#listen [::]:80;
server_name ssrtube.top;
rewrite ^/(.*) https://www.ssrtube.top/$1 permanent;
access_log off;
}
server
{
listen 443 ssl http2;
#listen [::]:443 ssl http2;
server_name http://www.ssrtube.top;
index index.html index.htm index.php default.html default.htm default.php;
......
求解
@小鵬, 看你配置里沒有ssl_protocols TLSv1 TLSv1.1 TLSv1.2;
listen 80;
listen 443 ssl;
server_name api.annicoco.com;
index index.html index.htm index.php default.html default.htm default.php;
root /home/wwwroot/api.annicoco.com;
#ssl on;
ssl_certificate /usr/local/nginx/conf/api_annicoco_com.crt;
ssl_certificate_key /usr/local/nginx/conf/annicoco.pem;
# include other.conf;
#error_page 404 /404.html;
location ~ [^/]\.php(/|$)
{
# comment try_files $uri =404; to enable pathinfo
try_files $uri =404;
fastcgi_pass unix:/tmp/php-cgi.sock;
fastcgi_index index.php;
fastcgi_param HTTPS on;
#include pathinfo.conf;
}
listen 443;
ssl on;
這樣的組合也試過,也不行
@小鵬, 發一下你的配置
https://api.annicoco.com/555.htm
按照博主的文章,安裝了兩次了,都報這個錯誤,大概是怎么回事呀
Secure Connection Failed
The connection to api.annicoco.com was interrupted while the page was loading.
The page you are trying to view cannot be shown because the authenticity of the received data could not be verified.
Please contact the website owners to inform them of this problem.
@Bon, lnmp1.1開始已經去除fcgi.conf,使用nginx自帶的fastcgi.conf,修改一下就行了。
軍哥你好
我使用後,出現
nginx: [emerg] open() "/usr/local/nginx/conf/fcgi.conf" failed (2: No such file or directory) in /usr/local/nginx/conf/vhost/bonbg.com.conf:48
nginx: configuration file /usr/local/nginx/conf/nginx.conf test failed
求教,謝謝!!
@hoyam, 你服務器上沒開443端口吧
您訪問的網頁出錯了!
(連接錯誤)
可能原因:網絡連接異常、網站服務器失去響應
建議操作:刷新重試
https://www.renhao.pw
@hoyam, 訪問有什么提示信息
配置沒問題,也顯示啟動成功了,但是HTTPS訪問不了網站
@Mr.Cong, openssl rsa -in jungehost.pem -out jungehost.pem.unsecure 然后修改nginx配置文件里的ssl_certificate_key 換成新的jungehost.pem.unsecure
# /etc/init.d/nginx restart
Restarting nginx daemon: nginxEnter PEM pass phrase:
重啟的時候需要輸入key的密碼的啊?軍哥,怎么去掉這個?
@dahai0401, 按提示你添加的地方不對
Restarting nginx daemon: nginxnginx: [emerg] "server" directive is not allowed here in /usr/local/nginx/conf/nginx.conf:88
nginx already running.
附上 nginx.conf 添加的那一段
server
{
listen 443;
server_name psvps.net http://www.psvps.net;
index index.html index.htm index.php;
root /home/wwwroot/www.psvps.net/;
ssl on;
ssl_certificate psvps.crt;
ssl_certificate_key psvps.pem;
location ~ .*\.(php|php5)?$
{
fastcgi_pass unix:/tmp/php-cgi.sock;
fastcgi_index index.php;
fastcgi_param HTTPS on;
include fcgi.conf;
}
access_log off;
}